

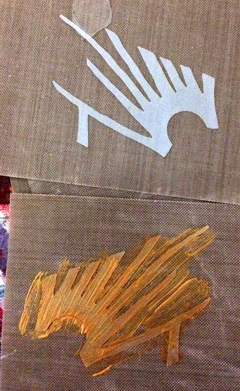
Spike-o-saurs and Aliens, a Tribal Torc
I live in the Southwest and the moment I laid eyes on these gut shapes hieroglyphs, kokopelli, aliens, herd beasts, stegosaurus– came to mind.
 I can’t stand to wear anything around my neck for more than a few hours so the necklace had to be light yet durable and come off easily when I need to be free.
Materials:
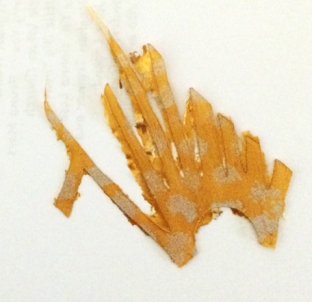
Stencil Guts – 3 beasts and 2 aliens
Carol Wiebe’s mini Circle Tower stencil for February 2016 StencilClub, and
a corner of the 9×12 stencil from an upcoming StencilClub release. See it on StencilGirl Talk on April 1.
ICE Resin®
Iced Enamels – Turquoise and Ivory Relique Powders and the Medium
Silver Glitz
Canvas
Metalic Acrylic Paint
2 jump rings
 Silk sari ribbon, 2 colors
Chain
Needle and embroidery thread
Tools:
Exacto knife
Non-stick craft mat
Paint brushes or sponges and a disposable paint brush for resin
Cups, stir sticks, and tooth picks
Scissors and paper to make pattern
Baby wipes
Craft Heat Gun
Instructions:
 1. Paint the front sides of your StencilGuts with metallic paint. Let dry then stencil some dimension on top. Use an exacto knife to trim excess.
2. Lay out your necklace elements on paper and make your torc pattern and then cut it out of canvas.
3. Place canvas on a non-stick craft mat.
4. Paint a coat of Iced Enamels Medium on fabric. The fabric will ripple, but don’t let this worry you in the least.
5. Sprinkle liberally with Relique Powder, mostly turquoise with just a hint of ivory and a hint of the glitz.
6. Melt with a craft heat gun aimed about an inch off the surface.
 7. Sew on the chain and sari.
8. Mix ICE Resin per manufacturer instructions.
9. Use a disposable paint brush to add a layer of resin to the fabric.
10. Place your painted StencilGuts.
11. Drip a little ICE Resin over the tops of your elements with your craft stick and nudge them with a toothpick if they move out of place.
Tip: ICE Resin dries crystal clear and hard on everything but fabric so your torc will have just the right amount of flexibility.
12. Torc is ready to wear after about 12 hours of drying time.

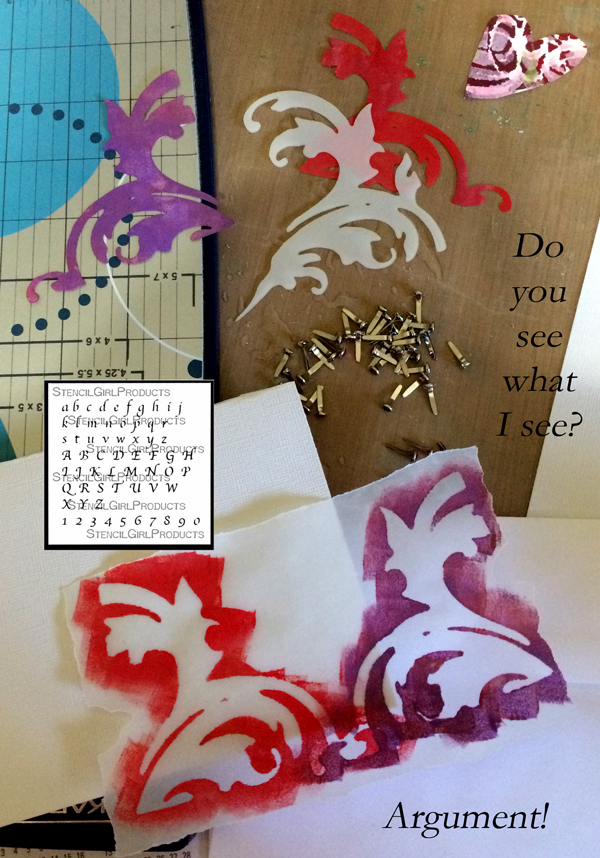
Apology Card

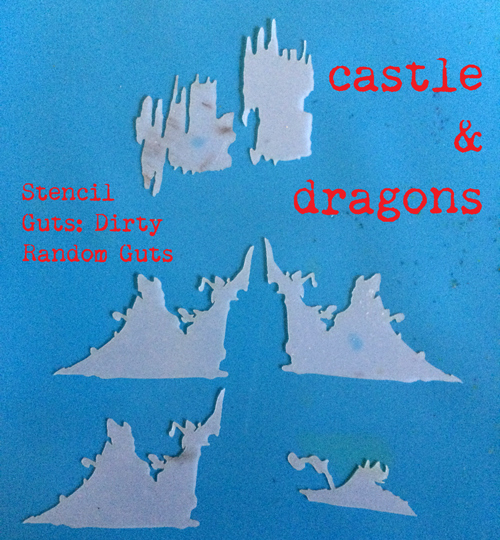
Castle and Dragons

 1. Paint on Flitter glue.
A Lullabye for the Dragons Sleeping in My Garden
by Carol J. Baxter, ©2016
Sleep little dragons
‘midst petals of rose
stars for your blanket
‘neath the moon you repose
Sleep little dragons
softly sings the brook
nightingale accompanies
in our storybook
Sleep little dragons
whilst bunnies stand guard
dream your big dragon dreams
soaring high, flying afar
Sleep now, little dragons
for she loves you true
roses bloom on the morrow
in diamond-like dew
The Princess in the castle
will come out to play
as golden dawn bathes earth
in a brand new day
Dragon Christmas Ornament


(Geometric Shapes, Birds, Cats & Rabbits, Flourishes, Hands & Body and Dirty Random Guts)
to one lucky winner!
(One comment per blog please.)

I do like those two having an Argument.
Thank you! Here’s wishing you a day without arguments 🙂
Your ideas are genius. Thank you. C21claudia@aol.com
Thank you for your sweet remarks.
That is one clever card! And I love your dragon! What fun!
Also…it might be hard to write a poem about an aardvark……
ah, Janet, a challenge to silliness 🙂 Just for you:
I’ve ears like a rabbit
and a kangaroo tail
a snout like a pig
and a truly long nails
earth pig or ant bear
is what I am called
but aardvark am I
and at night I do crawl
out of my burrow
to gaze at the moon
hoping my dragon friend
will come to play soon
Thanks!
I love your work!! So cool! xoxo
Thanks! xoxo
LOVE the dragons! Fantasy adds magic to life.
Must. Have. Magic. 🙂
The mind of a creative is amazing and yours is above and beyond amazing. The necklace is amazing and I love the apology card. Thank you for sharing your creativity,
Aw, thanks. Hope you have an art-filled day that brings a smile to your face.
What extraordinary art you created with these guts. Love love love !! ❤️❤️❤️
Thank you. Hope you have fun making art today!
This is all just ingenious! Bravo.
Thank you for enjoying our hop!
this is such a wonderful thing to do with “waste” make it an exciting art supply!
Thanks!
Your ideas are so delightfully out-of-the-box and so much fun to see — and you should market those apology cards; the world needs them!
The world is a scary place. We need art. And thanks!
Loving the random possibilities of those guts!!
Sorting them is a different experience each time.
Wow, so creative!
Thank you.
Interesting use of the waste.
Thanks! It was fun.
Looking for “things” in the clouds is something I used to do with my grandma. What a lovely memory your work has evoked. I love the dragons1
Imagination gone wild! So fun.
lorquil 3(at)gmail(dotcom)
Thanks!
Oh Carol! I love reading your posts and seeing your art. Funny, witty, entertaining, creative! The poem is wonderful, something I love and cannot do is work with words, love to see and read poetry and prose. And the ardvark in comments was fun too. Luck to all.
I grew up in poetry. Glad you enjoyed!
Silly is happy is healthy! kathyamt(at) mac (dotcom)
Absolutely!
Amazing!
You are sweet! Thanks!
these look like a lot of fun to play wiht
Wishing you fun dragons and critters to play with too!
Your glitter pieces are beautiful and unique! So many great ideas for using StencilGuts.
Thanks. We all had a blast!
I loved your poem and your work!
I appreciate your time!
OMG! I love your little StencilGut dragons and your poem about them! Wonderful!
Wishing you playful dragons!
Thanks for sharing!
Thanks for stopping by!
Genius idea!! Love how you used these
You are kind. Thank you.
What an interesting way to use the guts…I am suddenly getting a ton of new ideas!
Go for ’em! All of ’em!
What a post and what inventive ideas! And yet I get the feeling you could have kept going 😉
Well done.
There was one more, but concept is not always followed by magic 🙂
What creative creatures you have found in your mixture of Stencil Guts! I love what you have done with them…..
Thanks so much!
I just didn’t “get it” at first but then I just had to chuckle!! Stencil Guts!! FUNNY & fun!! I want some!! I LOVE using “leftovers” & love to recycle anything I can for my greeting cards.
Glad we could bring a chuckle to your day!
You are so creative!
Thanks! I bet you are too!
No guts no glory!
I could “pun”ish you for that. Hee hee hee. Too funny!
That first dragon looked like dirty guts that come out of pumkins. I do really hope I get an ardvark.
Maybe I will just paint ’em next time. 🙂
So clever and creative and poetic, Carol! So happy you are hopping with us and sharing your talents and inspiration!! Your rocked this hop!! xo
xoxox
I love your imagination. So clever. Those dragons are soooo cool
Brilliant idea using the gold leaf.
Love the spike o saurus and dragon is cute and not aardvarkish at all, lol
i’d love to play with these. Keeping my fingers crossed I win
g.spindrift(at)gmail(dot com)
Wow! I never thought that I would want to win a bag of guts, but YES, I want to win a bag of guts! I’m going to have to make my own guts too! This could be trouble. 😉
Oh wow I would be over the moon to win these! dicegrrl (at) yahoo (dotcom )
Pareidolia is one of my favorite words!
Love the guts. You have really shown how to use them in a completely different way. Thank you. suzschultz23(at)aol(dot)com
WOW! you have created some beauties with those guts!
Love your ideas. I hope I win.
Alisabarott (at) gmail (dot com)
What a wonderful creative imagination you have! Your work is so unique and colorful, full of poems and shapes in the clouds (I still look at clouds and pick out shapes in them!) Phenomenal ways to use the guts. Thanks for seeing things in them I never would have!
JaniceBond*at*gmail[dot com]
Lots of fun to be had with random stencil shapes!
Love your poem!!! And your projects are SO original and creative! Thank you for sharing!!
I’m new to all this so I would love these, Love me some Stencils & Stencil Girl ❤ These are awesome!!!
You have a most vivid imagination, Girl!! Hope to see some new stencils from You soon11
Love them all but think I need a torc. I will lift that idea.
Thanks and by all means. It was the most fun!
I am thrilled to see your necklace that you made from canvas stencil guts & resin! I am allergic to medals so plan on tweaking & making myself some wearable art! THANKS!!
cbfigiel (at) gmail (dot com)
Ohhh! Hope to see what you come up with!
Love your creativity, thanks for sharing.
What a clever use of the stencil guts!
Wow I love the flitter look would add character to the clay medallion Gwen made in her tutorial🙃
WOW- this is amazing- so clever & beautiful – charcats7@gmail.com
what a creative way to use these! Love the variety!
such great ideas and inspiration…thanks for sharing your guts with us 😀
You are definately very creative! You took odd shapes and created very imaginative pieces. Love the dragon ornament and your poem is fantastic.
Gloriuos guts ! I love the dragon he did not come to life for me UNTIL you put him on the background!
Very cool! jill (at) jillholmes (dot) me
I love it!!
So glad you joined us on the hop – your projects are all so fun! I love the shapes you saw in the different pieces, and I never thought to use gilding flakes on them – great idea! I also didn’t know you could use ice resin on fabric. I learned a ton from your post – thank you!
So many great ideas! Thanks for sharing.
What imagination you have! I love your ideas!
I am thrilled that the cloud watching child within you is still alive and well! And thank you for letting us all in and sharing that to us all! I love the glass ring idea too!